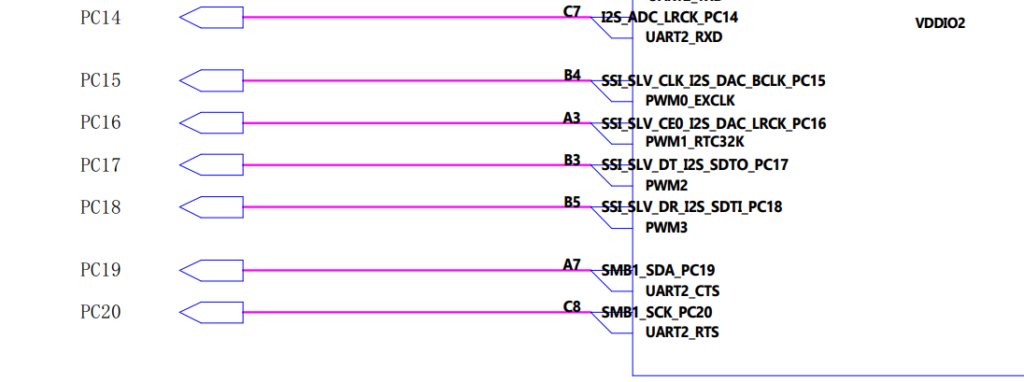
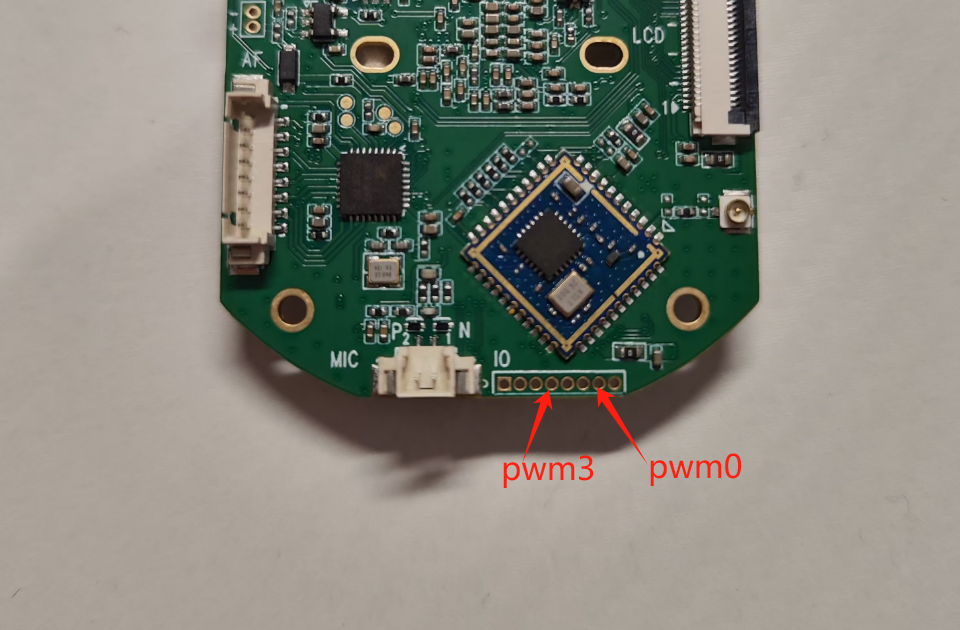
AIOTNIK-ONE开发板预留了4个pwm控制通道,给开发者用来控制GPIO输出不同频率的电平波形来控制pwm外设,如普通GPIO口的Led灯的亮灭,明暗度等。以及控制普通直流电机的转动,速度快慢,方向等。这些功能用途可以用来实现四驱车,小风扇,led呼吸灯等外设功能,供开发者可灵活发挥其用途。以下是PWM的原理图和实物图。

如下实物图, 从右边第二个GPIO口开始到第5个GPIO口,分别是pwm0、pwm1、pwm2、pwm3。

以下是pwm的测试代码pwm_test.c,代码实现了PWM 周期的设置、占空比、极性以及启用 PWM 通道等设置功能;
#include <stdio.h>
#include <stdlib.h>
#include <string.h>
#include <unistd.h>
#include <errno.h>
#define PWM_DIR "/sys/class/pwm/pwmchip0/pwm"
// Function to write a value to a file
int write_to_file(const char *path, const char *value) {
FILE *file = fopen(path, "w");
if (!file) {
perror("Error opening file");
return -1;
}
fprintf(file, "%s", value);
fclose(file);
return 0;
}
int main(int argc, char *argv[]) {
if (argc < 4) {
fprintf(stderr, "Usage: %s <channel> <period> <duty_cycle> [polarity]\n", argv[0]);
return 1;
}
int channel = atoi(argv[1]);
int period = atoi(argv[2]);
int duty_cycle = atoi(argv[3]);
int polarity = (argc >= 5) ? atoi(argv[4]) : 0;
char path[256];
char pwm_path[256];
printf("PWM test start!\n");
// Prepare PWM channel path
snprintf(pwm_path, sizeof(pwm_path), PWM_DIR "%d/", channel);
// Export the PWM channel
snprintf(path, sizeof(path), "/sys/class/pwm/pwmchip0/export");
FILE *export_file = fopen(path, "w");
if (!export_file) {
perror("Error opening export file");
return 1;
}
fprintf(export_file, "%d", channel);
fclose(export_file);
// Check if PWM channel directory exists
if (access(pwm_path, F_OK) != 0) {
perror("Error accessing PWM directory");
return 1;
}
// Change directory to PWM channel
if (chdir(pwm_path) != 0) {
perror("Error changing directory");
return 1;
}
// Set polarity
snprintf(path, sizeof(path), "polarity");
if (polarity == 0) {
printf("Polarity is normal\n");
if (write_to_file(path, "normal") < 0) return 1;
} else if (polarity == 1) {
printf("Polarity is inversed\n");
if (write_to_file(path, "inversed") < 0) return 1;
} else {
fprintf(stderr, "Invalid polarity value. Using default.\n");
if (write_to_file(path, "normal") < 0) return 1;
}
// Enable PWM
snprintf(path, sizeof(path), "enable");
if (write_to_file(path, "1") < 0) return 1;
// Set period
snprintf(path, sizeof(path), "period");
printf("PWM cycle -> %d\n", period);
if (write_to_file(path, path) < 0) return 1;
// Set duty cycle
snprintf(path, sizeof(path), "duty_cycle");
printf("PWM Duty -> %d\n", duty_cycle);
if (write_to_file(path, path) < 0) return 1;
printf("PWM test complete!\n");
return 0;
}
编译和运行:
确保您的 PWM 通道目录(PWM_DIR)存在并正确配置后。编译和运行代码如下:
mips-linux-uclibc-gcc pwm_test.c -o pwm_test
./pwm_test 1 10000 8000 1
pwm_test测试程序使用方法:(例如使用1通道,周期10000,占空比8000,极性反转)
./pwm_test 1 10000 8000 1 第一个参数表示PWM通道
第二个参数代表PWM周期
第三个参数代表PWM占空比
第四个参数代表使用极性,0表示默认极性,1表示极性反转
若直接运行程序./pwm_test,将使用默认产生进行输出
使用注意事项:
1.使用时最多同时打开3个通道
2.使用时可以不输入参数或输入参数时不输入极性

如上图,设备终端程序运行测试结果,表示已经成功的设置了pwm1通道,周期为10000 ,占空比为8000,极性为反正

